Thrifty Little Mom

Thrifty parties, celebrations and gatherings!

  • Party Themes
  • Party Food & Drink
  • Holiday Party
  • Party Prep
  • About + Privacy Policy
    • Start Here
    • Privacy Policy
  • Party Shop

Home Renovation Without Remodeling

June 24 By Kim Anderson

This post contains affiliate links. If you click & make a purchase, I receive a commission! Thanks! Read my full disclosure policy. As an Amazon Associate I earn from qualifying purchases.
  • Share
  • Tweet

Are you one of those people who decided to spend a little less for an older home because you saw lots of promise and charm beneath the 80’s or 90’s decorating nightmare shell?  This was us and we decided to renovate without remodeling!  

We found ourselves a short sale in 2009 and even though the wallpaper made me want to vomit and the walls were a circus of different colors, we got the perfect house for us but it needed a little TLC. 

Home renovation costs can get out of control super fast.  So that’s why I wanted to give you some of our simple home renovation ideas in hopes that it will help you update some items around your home without having to totally remodel.

Maybe you’ve lived in your house for decades and you just know it’s time to make some updates, like the time you decided to take the shoulder pads out of your dresses and ditched the extra tease in your hair.  Whatever your motivation to update- you can do it!

Honestly, sometimes the simple fixes in your home can make a big difference.  Those changes can be as a little as a $5 can of spray paint to as much as a $200 ceiling fan.  This article is about how to re-style your older home without remodeling. These are all cheap DIY Home Improvement Ideas.

My neighborhood is comprised of homes built in the mid- 80’s.  (So what you see throughout the post will be tips on how to update a house from the 1980’s but it can certainly be applied to other homes from other decades as well.)

My neighborhood is also full of couples in their mid 20’s to mid 30’s.  I was kind of surprised by this.  I thought we were just old souls. Apparently, with the market full of short sales and repo’s people buy older homes because they’re cheap!

In cases like mine where we got a decent deal on our home, we also got a home that hadn’t been updated since “Full House” came on TGIF.  Therefore there are things I like about my house but also things that aren’t so fabulous.  Sure I’d love to do a major remodel in the kitchen but I’m learning over time that it’s important to love the home your already living in.

The wallpaper and borders came down immediately, but there were other areas that really needed improvement. Here are my home renovation tips on a budget based on what we did in our own house.
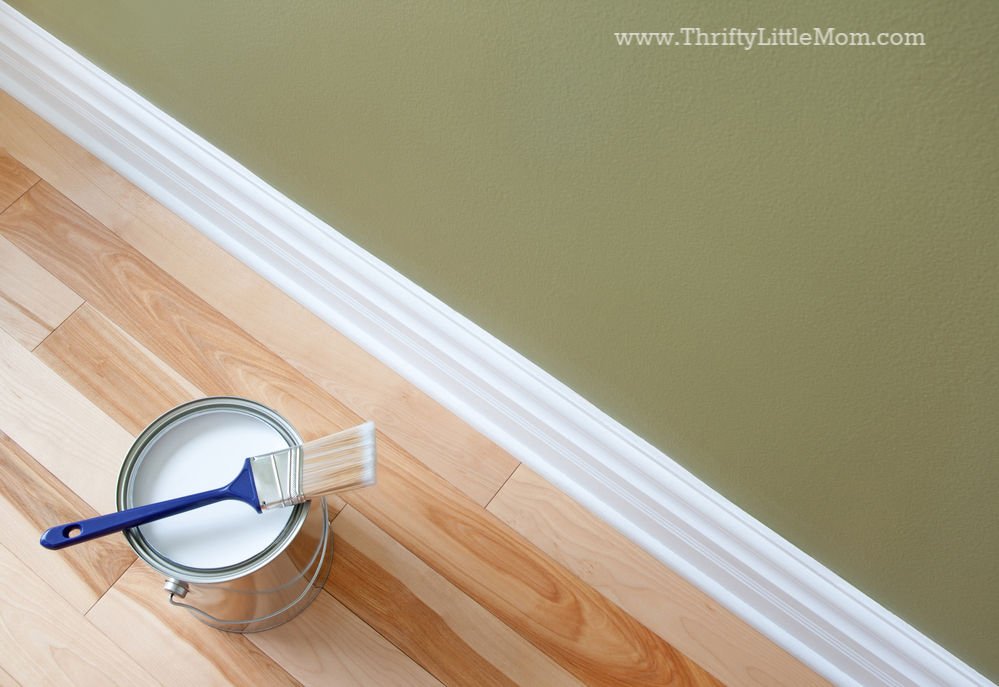
1. Painting

Man, what a fresh coat of paint can do for a room.  It can really update an old house on budget!  I recommend picking a relaxing color. One you can live with and love.
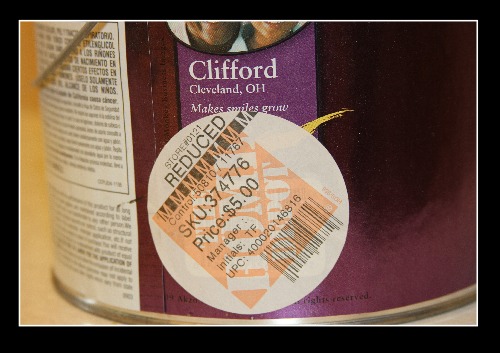
$5 Per Gallon Paint-

  • Paint gets expensive!  So every time I go to Home Depot, Lowes, Ace or even Walmart, I immediately go to the, “Oops!” paint shelf.  Every one of these stores has one, you just have to ask a store associate where it’s located.
    • The “Oops!” paint shelf is where stores house gallons of paint that people have returned or denied because there was an issue with the color.  Meaning, it wasn’t exactly what they wanted or didn’t match.
    • The store discounts these gallons to cost anywhere from $2.50 to $5.00.  I look for light/neutral colors.  Sometimes you luck out and there is more than one gallon.
  • Best uses of Oops Paints?
    • Small Spaces- For my closets, small rooms or small bathrooms, the Oops! paints were perfect!!!
    • Priming- These are also perfect for priming those rooms where you plan to paint over a darker color with a lighter color, thereby needing more coats than normal.

Home Renovation with Opps Paint Picture


Paint w/ Primer- Lowes (Valspar Paint + Primer) and Home Depot (Behr Ultra) sell this kind of paint.  It works better at getting a good coverage on the walls.  I still have to do two coats but they are solid coats when I’m finished.  I have only used Behr brand.  I will never buy plain paint again.

  • Warning on Color Selection-  For years we had rented.  When renting, I never wanted to mess with painting because I didn’t want to have to paint it back when I moved out.  So when we bought our first home, I couldn’t wait to paint my bedroom a deep red color.  TERRIBLE IDEA!!!
  • First of all, it took 4 coats of paint/primer to get the walls covered.  Then, I really disliked being in my room.  My advice is to pick a calming color for the rooms you spend the most time in!

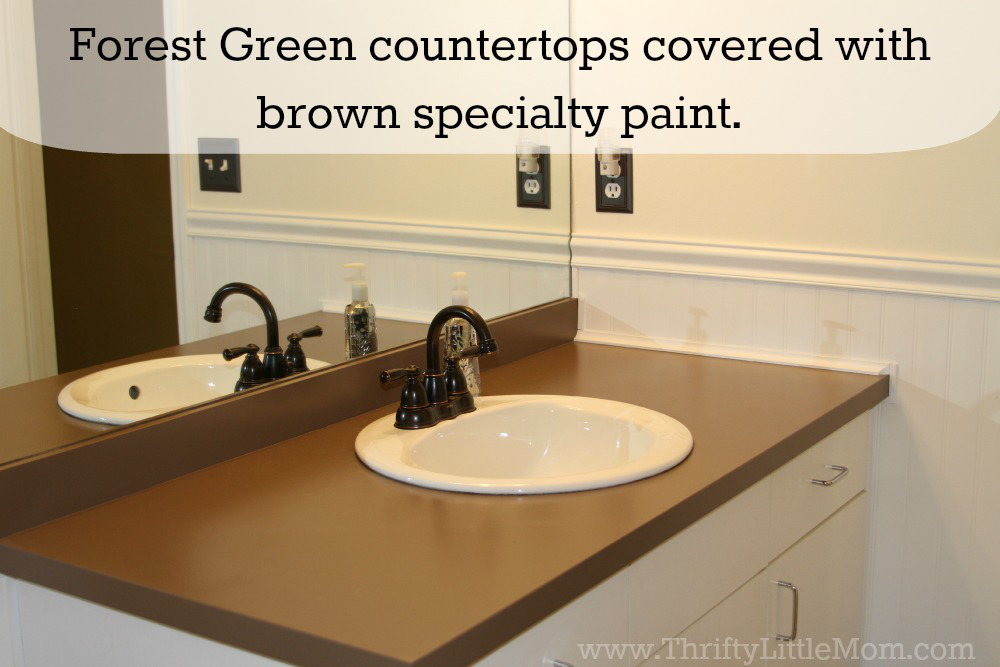
2. Simple Home Renovation Before and After Counter-tops


Counter-tops are one of those expensive messy jobs.  Ours were a dark forest green color.  It was quit terrible.  While at Home Depot I ran across this small container of paint made by Rust-Oleum that was supposed to be made for painting counter-tops.  It’s called: Rust-Oleum 263206 Countertop Coating Premix, 32-Ounce Kit.  I was really skeptical at first.

In fact, I bought some and my husband was so skeptical he asked me to return it.  But after we decided that replacing the countertops was not in the budget, we just went for it!  It was worth it!!!  It does exactly what it said it would do and now I have really nice looking counter-tops in my bathroom for about $40 with no ripping out of anything.  This is defiantly one of those weekend home improvement projects.


Home Renovation After bathroom picture

Counter Top Paint UPDATE:
  • I have had these counters for 4 years now and have only two tiny places that paint has chipped off.  You can’t see them unless you stare and they can be touched up.  
  • With this particular color of paint I find that when water splashes on the counter it form as water stain that you can see until the water dries and it will disappear.  
  • When you go to clean the tops, you will see the spots again until they dry.  
  • Despite the water mark stuff, I love the counter-tops far better than my previous ones and the bathroom still looks much better than before.  I would do it again.

They also make this Rust-Oleum 258512 Counter Top Transformations, Small Kit, Charcoal paint for kitchen counter updates which is a little more expensive but based on the way the bathroom turned out and if I was struggling to live with my current kitchen counters, I’d give it go!


3. Lighting/Ceiling Fans Home Renovation Before And After

My husband is an electrical engineer so I kind of have a pro around to do these kinds of jobs.  To make our house consistent, we tried to pick the brushed bronze finish fixtures for our whole house as we replaced lighting. Check out his cool video showing how to spruce up your outdoor lights with a little spray paint metal primer and spray color paint:
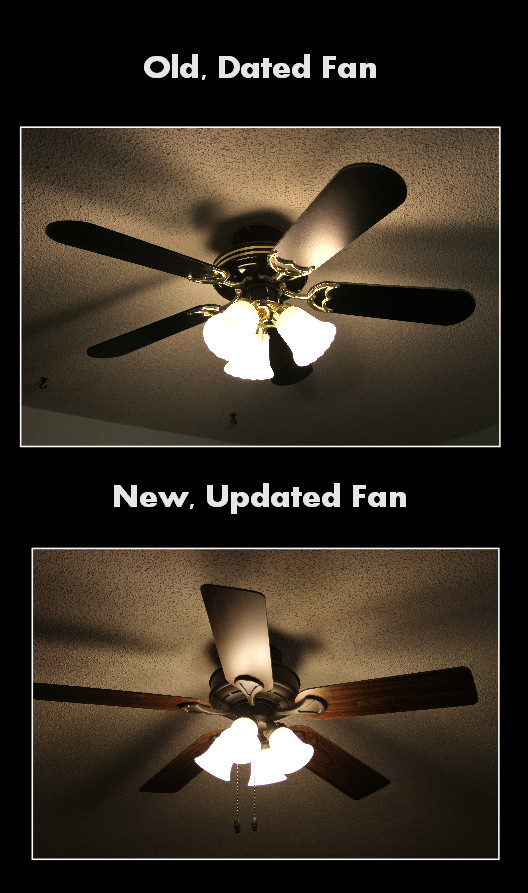
 

Ceiling Fans- 

  • We used to have old black fans with gold accents and half the light fixtures were dangling or not even working.
  • Grab a new ceiling fan w/ light and you get an instant update to a room.
  • Tip: We decided to make sure that as we made home renovation updates to each room, that we stuck with a similar color and style of fan. That way the master bedroom didn’t have leaf looking fan blades while our son’s room had a space-themed fan.
  • New fans can range from $60-$200 and you can search for your favorite colors, styles and brands pretty easily on Amazon.com.
Home Renovation Before and After Old Fan and New Fan


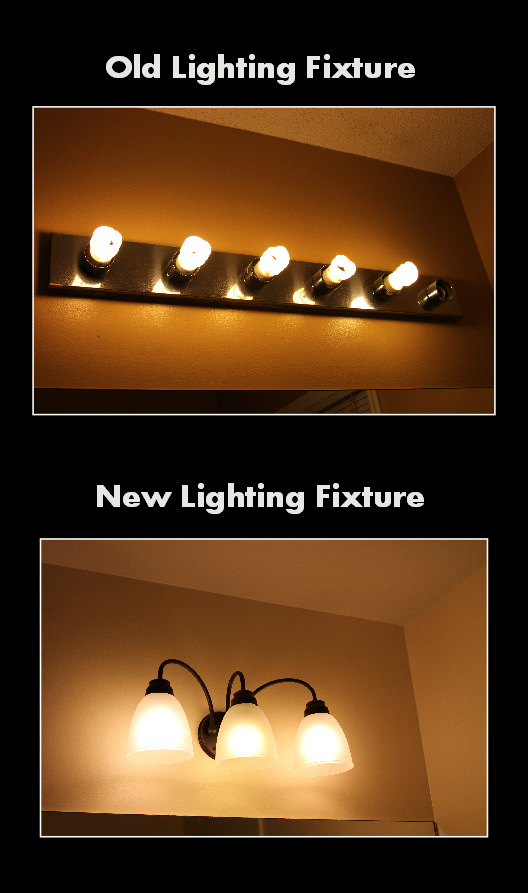
Bathroom Vanity Lights House Renovation Before and After

Just buying a new, updated vanity light can change your bathroom’s look!

  • Price range $40-$100 with great options online!

Home Renovation Old Lighting New Lighting

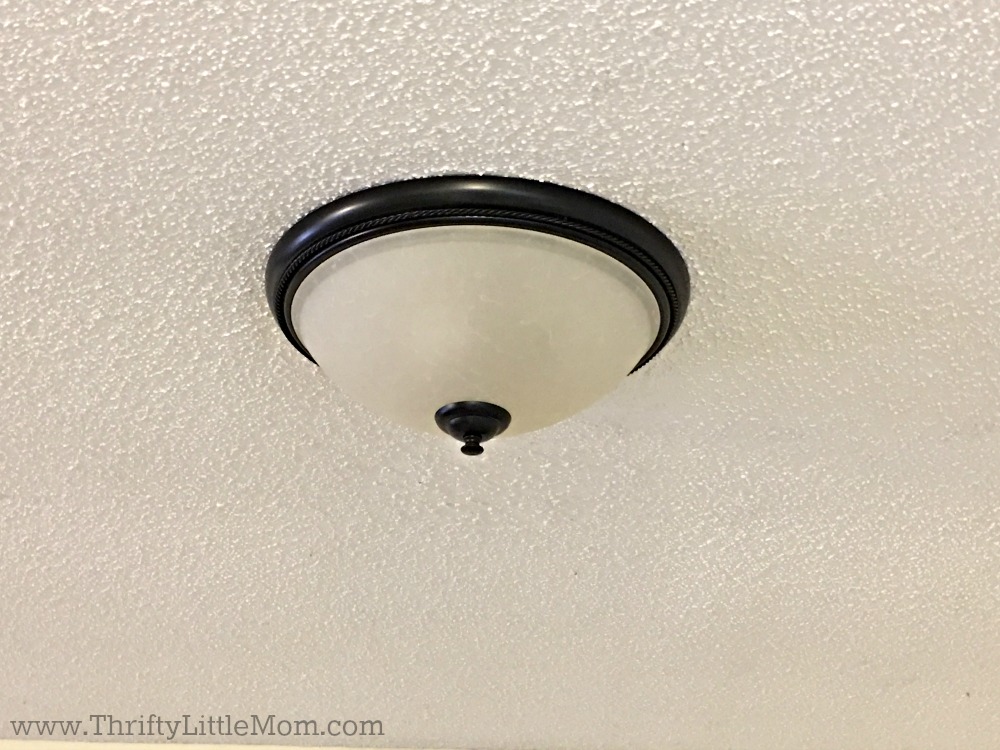
Replacing Old Chandeliers-

There is a time and place for nice chandelier or low hanging light fixtures but honestly, the kitchen isn’t always the greatest spot.  In most of the homes I’ve lived in, low hanging kitchen chandelier lights results in many head bumps.

Our new home had a really weird hanging chandelier style light that was really, really low in our small kitchenette.  We replaced the low hanging chandelier light with a flush dome light and now we don’t hit our heads, we have plenty of light, and it looks like we added a few feet to our kitchen space.  

There are many many cool styles of these lights so be sure you check them out to see which ones would take less space but add the style and look you want to your own home.

  • Price range $20 – $50.
    Home Renovation dome light update

Outdoor Light Fixtures:

About 2 years ago we freshened up the paint on the outside of our house.  Once we had refreshed everything, I struggled with the appearance of the brass finish outdoor light fixtures and even the brass door bell button.  

Instead of going out and buying brand new fixtures my husband simply updated them with a little patience and some spray paint and now they look brand new!

My husband has a Youtube channel called Makercise and here’s the video he created to show you how you can fix up all your own outdoor lights for under $15 with some easy to find spray-on self etching metal primer & spray paint!


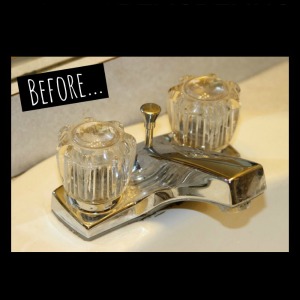
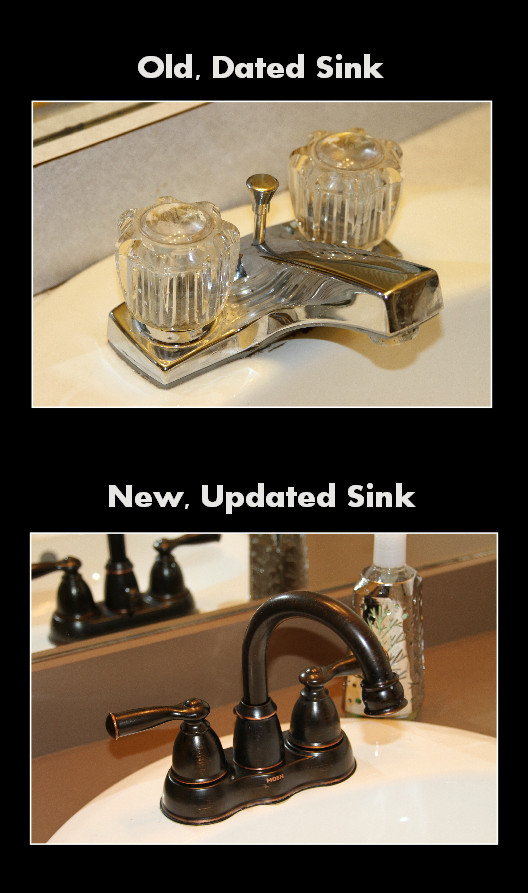
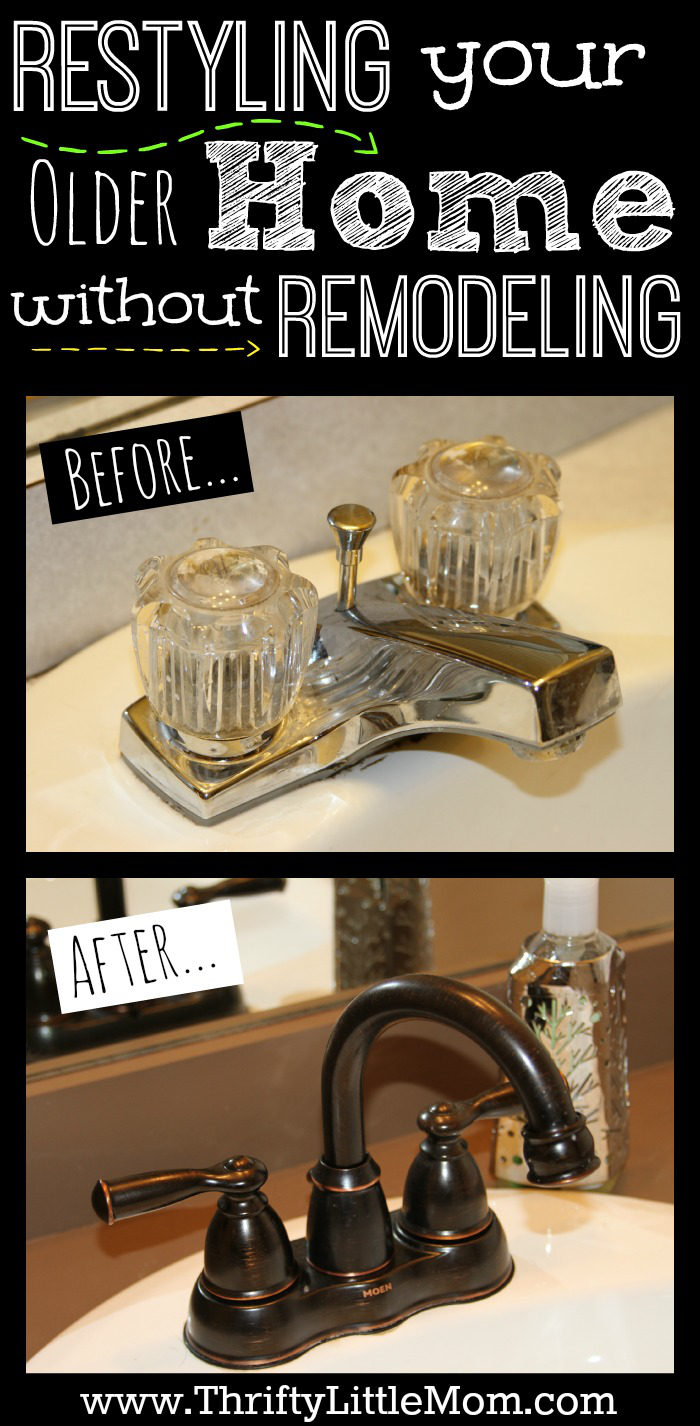
4. Outdated Bathroom Faucet Home Renovation Before and After

These make a huge difference in updating a bathroom or kitchen. They can also improve functionality.  I hated wrestling to get things like canning pots or bottles under my old faucet.  Now that it is arched and skinny I can fill up all kinds of stuff in my bathroom and kitchen sink!

  • Price range $50-$200.

If a project like this seems daunting, websites like Lowes Home Improvement have simply DIY videos on how to Replace a Bathroom Faucet. 

home renovation before and after sink


5. Update Old Hardware-

One interesting problem we came across in our journey to restyle our kitchen and bathroom was that our cabinets were made in the 80’s and new hardware doesn’t actually fit our old cabinets. Therefore, when we tried to replace drawer and cabinet handles with new hardware, the new hardware didn’t line up with the old holes.

So we decided to simply prep and spray paint the hardware around our home which was way cheaper and actually came out looking nice.  

We are fans of the brushed bronze look and it’s now on all our fans and lighting fixtures so we are updating hardware around our house to match with paints like this Krylon K09191000 COVERMAXX Spray Paint, Brushed Metallic Oil Rubbed Bronze.


If you are thinking about renovating a house:

I know that it’s easy to watch TLC and all those channels and watch as people basically destroy and old house and make it look amazing and new but that stuff takes a ridiculous amount of time, research and money to ensure that works out in your favor.  

I have several friends that have been through this journey already and give you great insights into how to avoid Flipping a House that Flops and 3 Income Property Mistakes to avoid.

Well, there you have it.  Four ways that you can do a home renovation without having to do a major re-model.  It really makes a huge difference and you can expect to pay under $100 each if you are be thrifty about it.  

I believe that many of these suggestions are super easy home improvements that add value to your own enjoyment of your home as well as when/if you decide to sell.


How to restyle your older home without remodeling. There are many thrifty ways that you can update your home without haveing to remodel and spend thousands of dollars.


articles related to this post

  • Should I Rent or Buy a Home?
  • Our $20,000 Farmhouse Renovation Story
  • How We Paid Off Our Mortgage In Two Years on One Income


Kim Anderson

Kim’s is the party planning, cupcake loving, celebration catalyst behind the Thrifty Little Mom Blog. Kim was a pro event planner for over 7 years before she became a full-time blogger. Kim is the author of: Live, Save, Spend, Repeat: The Life You Want with the Money You Have. She’s been featured on Time.com, Money.com, Good Housekeeping, Women’s Day and more! Kim aims to inspire you to create parties, celebrations and gatherings that everyone loves!

Summary
5 Simple Home Renovation Tips Without Remodeling
Article Name
5 Simple Home Renovation Tips Without Remodeling
Description
Quick fixes for updating an older home on a budget. From lighting, to paint, to hardware, to sinks, this article gives ideas on how to update your home.
Author
Kim Anderson
Publisher Name
Thrifty Little Mom
Publisher Logo
Thrifty Little Mom

Filed Under: Uncategorized Tagged With: cheap diy home improvement ideas, easy bathroom remodel, easy diy updates, home renovation, home renovation tips, inexpensive home updates, old home fix up's, thrifty home renovation, updating a 80's house, updating bathrooms, updating my house

« Adult Chore Charts for Husbands & Wives
Buying Your Family Eyeglasses Without Going Broke »

Comments

  1. Joanne says

    March 19 at 10:54 pm

    Thanks for the ideas. Paibted my kitchen counters today. Love them!
    What a boost for only $19.99.

    • Kim Anderson says

      March 21 at 8:11 am

      Joanne that’s awesome!!! I’m so glad you are happy with how they came out. Any tips for people that you learned along the way?

  2. Anonymous says

    September 29 at 11:01 pm

    Thank you for this article. I declare you are living in my house twin. Just knowing where to begin has been extremely overwhelming for me.

  3. Bonnie says

    September 6 at 9:55 pm

    Totally agree with everything except the “boob light” hate those things. Would love to try the counter paint in my bathroom. Waiting on someone to try the bath tub paint though, that’s my eyesore.

    • Kim Anderson says

      September 9 at 1:52 pm

      Bonnie that is too funny! I’ll never be able to unsee the boob light now. lol The counter paint is really good if you need a sort of bandaid and your budget is tiny. It makes it acceptable if you know what I mean. Bathtub paint is something I need to look into myself for our master bath. Thanks for that idea because now I’m gonna have to look into that!

  4. Chad Pfeffer says

    November 2 at 12:53 pm

    There are so many wonderful ways to spruce up your house without breaking the bank. All your tips are great. I remodel homes for a living and often encourage clients to pick and choose where they want to spend the money on a quality product and where they can save. We often find we can create what they want within their budget. THanks for sharing!

    • Kim Anderson says

      November 2 at 6:24 pm

      Chad, thank you for taking the time to share your own tips!!! I’m all about investing in quality products in the spaces that get used most!

  5. Antonella says

    July 12 at 11:32 am

    I cannot believe your before pics…it is like you broke into my house with a camera !!!! Lol
    Cannot wait to get started now, thank you

    • Kim Anderson says

      July 12 at 6:39 pm

      Antonella, so happy that you’ve found some inspiration. It’s a lot of work but it’s easier than taking stuff out! Good luck! I’d love to see your progress when you start working on it so feel free to tag me on Instagram or email them my way!

  6. Pam says

    April 2 at 11:01 pm

    I’m not sure how old these comments are, but I wanted to chime In about how much I love the Rustoleum bronze spray paint. I used it on all sorts of things – the inside of my shower handle, the tub stopper in my Jacuzzi tub, and my heat vents! I did all of this over 4 years ago, and they still look great. I also spray painted my handle on my storm door, and that one did scratch off in some places.

    I have a question that has me stumped. My daughter is looking into purchasing her first home. It was built in 1945. The small bathroom has the texture stuff that typically you see on ceilings but it’s all over the walls! I have no idea what that is about, other than it probably had cracks or something so it was a quick inexpensive cover up. Any ideas on how to cover that up without a- spending a lot of money and b- won’t take a lot of hard work. Any suggestions? I had thought about bead board, but I don’t know that it would look right floor to ceiling. I don’t mind it on the ceiling, but not on the walls!

    • Kim Anderson says

      April 5 at 9:37 pm

      Pam, are you talking about the popcorn ceiling is on the walls?

      • ariel says

        April 26 at 12:19 pm

        I loved this article BUT I have to say your video ads are absolutely miserable. They kept causing the page to jump around to the most recently-playing ad. Because of this, unfortunately, I won’t be able to visit this site again. It was literally infuriating and I had to force myself to finish the article and not just abandon ship mid-read.

    • Georgina says

      June 13 at 1:19 pm

      its probably too late to answer this, but I did a bathroom completely in bead board and it looks fabulous. It’s an older house, used nickel fixtures, and I couldn’t be happier with the look.

      • Kim Anderson says

        June 13 at 9:05 pm

        Georgina! Never too late. Thanks so much for sharing. We put up bead board too and that’s coming in a future post. We loved the look too! Thanks for your input.

  7. Melissa French, The More With Less Mom says

    March 21 at 4:28 pm

    It’s crazy what a difference a faucet can make in the look of a whole room. Thanks for posting. Hello from Thrifty Thursday.

    • Kim Anderson says

      March 22 at 9:12 pm

      Thanks Melissa! Yes, I was amazed too!

  8. Nikki @ Growing Up Mom says

    March 19 at 9:51 pm

    Great ideas, I really needed this. My husband and I are on a tight budget, but want to make some quick and easy DIY fixes to make our house look a little better, at least until we have all of our debt paid off and can afford to spend cash to remodel. We are actually looking at getting peel and stick linoleum for our kitchen and hallway, we bought the house with faded and ripping linoleum and need to replace this as soon as we can.
    We also need to look into redoing our kitchen counter at one time, do you think the rustoleum would work on this like it did in your bathroom? I saw your after notes and just wanted your opinion on this.
    I totally agree on painting, it makes a huge difference! I am going to have to see about the “oops” paints for the rooms we haven’t already started on. Another place to check out is to see if you have a local “Re-Store” by habitat for humanity, you can just search “re-store” and it should pull up.

    • Kim Anderson says

      March 20 at 12:06 am

      1. My Father in law who has build several homes loves peel and stick linoleum. In fact we used the new stuff recently for our bathroom that only has the sticky on strip on one side of the long panel. It’s been great! They make it for kitchen counter-tops. I might check out some reviews on the kitchen product on Amazon but our bathroom is holding up pretty darn good.

      2. I might search for Habitat for Humanity Re-store as I think that’s what they are called.

      Good luck with your debt free quest. Sounds like you are doing it the right way!

    • Jayme says

      June 7 at 8:19 pm

      The previous owners of my current house used the rustoleum and I HATE IT. It chips and is bumpy. I can’t wait to replace the counters.

      • Kim Anderson says

        June 7 at 11:37 pm

        Where did they use it? In the kitchen or in the bathroom? Do you know how long ago they painted them? I feel like the kitchen is a more heavily used space and it might be more problematic. Ours still seems to be holding up well in the kids bathroom. I’m sorry you have had such bad experience.

  9. Karmen Allen says

    March 19 at 1:22 am

    Hi Kim,
    I absolutely love your tips and ideas! Thank you!
    One question, any thoughts on a ugly gold trimmed shower frame door and fixtures?
    Any ideas on how to transform those would be so appreciated!
    Thank you!
    Karmen Allen

    • Kim Anderson says

      March 19 at 8:58 am

      Ah, the shower frames. I have silver ones in my master bath and look so terrible. I’ve read of people taping everything up and painting fixtures to all match including door handles. That would be the simplest solution without ripping everything out. Sorry I couldn’t offer more than that but the truth is pretty much ANYTHING now can be painted and there is probably a paint made to cover whatever material you are wanting to change. Just find out what it’s made out of and ask your home improvement store staff.

  10. Betty says

    March 14 at 1:45 pm

    One very important thing that most buyers never think about is re-keying the locks or replacing them. We have a rental property and once after the renters moved out their teenaged son went back in and had a party. They didn’t do much damage but we did have pizza boxes on the roof and garbage to clean up. It could have been much worse. You never know how many copies of your keys are floating around or who has them!

    • Kim Anderson says

      March 15 at 8:31 pm

      Betty! THAT IS CRAZY! Thanks so much for sharing that!

  11. Toni says

    March 12 at 11:09 am

    I have been wanting to try that countertop paint in our bathrooms but am a little nervous about it. This post may have just given me the inspiration I needed. Thanks for sharing…it all looks great!

  12. Tiffany says

    March 8 at 11:03 pm

    Oh man, I love this post! We just bought a home that is over 100 years old and hasn’t been updated since probably the 60s. These are some great ideas for making it look more my style and less old-lady-ish! I really hate the kitchen counters, and I am definitely going to try that counter top paint you suggested. And I never thought of just changing out the faucet!

    • Kim Anderson says

      March 9 at 11:09 am

      My husband would be envious of your house! There are so many products out there today that can do so much to an outdated house for not a lot of money. Good luck! Thanks for commenting.

  13. john healy says

    January 23 at 11:34 am

    I am trying to find replacement pieces for a number of things around my 1920’s house. I live in del co. pa. and cannot find any stores that deal in old home parts any more. used to be one in Ardmore pa. but not there anymore. can you help me find a place? Thanks, john

    • Kim Anderson says

      January 23 at 4:20 pm

      I might try Etsy or Ebay. People will sell stuff like that most likely on sites like that and it will be easier to find, buy and get to your home. Hope that helps.

      • Paula Zaiss says

        January 27 at 11:08 am

        On finding hardware and accessories that are for older houses…there are flea markets in Kansas City…..a lot of them that have all of that….”West Bottoms Antique dealers” …just google it….also…..Rejuvenation is great….a bit pricey….but they have wonderful reproductions of everything needed to renovate an old house. Also…look on “This Old House” website…as well

        • Kim Anderson says

          January 27 at 2:08 pm

          Paula, thanks for all the great tips! I’m going to check out the This old House website today!

    • Betty says

      January 28 at 3:22 pm

      Try a habitat for humanity ReStore. They get in a number of older and antique fixtures.

      • Kim Anderson says

        January 28 at 8:36 pm

        Betty, that’s a great place to get items! Thanks for sharing that with the readers!

  14. lourdes says

    January 6 at 6:10 pm

    Great job!! Its the simple timeless changes that make a difference.

    • Kim Anderson says

      January 6 at 9:06 pm

      Lourdes, thanks!

  15. Vicki says

    November 28 at 9:29 am

    Great transformations! I have used all kinds of paint with great results. At our last house, a rental, I bought 5 gallons of oops paint, in similar shades dumped them all in a 5 gallon bucket and came up with a great shade for living room, hallways, and kitchen.
    When we bought our home last year, my husband insisted on good quality paint. Sherwin Williams has great paint but it is very expensive, even with 40% off coupons.
    We decided to try Clark & Kensington paint, with primer, from Westlake Ace Hardware, and never went back to Sherwin Williams again. It goes on great and resists chipping and washes easily. They so it for about $30.00 and have great sales on it and a guarantee.
    Also, watch Craigslist for these home updates. Lots of people buy things and never use it and sell it cheap just to get rid of it. And if your lucky it can be found in the priciest parts of town. If your patient you can find everything you need. We’ve bought light fixtures, a couple of huge rugs in excellent condition, a brand new Kitchenaid 6 burner gas cooktop($600.00) and Kitchenaid range hood($125.00), a huge slab of Silestone Quartz countertop($500.00), and a granite sink that came with a $1000.00
    Kohler faucet for $75.00.
    We will be able to finish our Commercial kitchen update for under $2000.00. I also talked my husband into installing a pot filler over the cooktop and we found that at Home Depot for under $200.00.
    We tore out the carpeting and did stained concrete floors and love them. We are both in our mid 50 ‘ s and have tried to make upgrades that are going to last our lifetimes with minimal maintenance.
    I also shop at Estate Sales, garage sales, Hotel Liquidators for mirrors, lamps and artwork. The usually have big framed and matted art that I buy and then put my own artwork into. Costs about $10.00.
    Love your blog and will be following. Thanks for sharing with us.

    • Stacey says

      January 5 at 11:54 am

      Habitat for Humanity has many stores in several areas that sell donated items from stores as well as people that donate used or extra materials. They have everything from tile and wood flooring to light fixtures and faucets for extremely low prices. Everything they offer is brand new or looks like new. They even sell wood from one to five dollars for diy projects! I highly recommended checking it out. Thanks for your tips as well!

      • Kim Anderson says

        January 5 at 1:38 pm

        Stacey, I totally forgot about the Habitat for Humanity store! That’s a good one. They aren’t so great in my area but they do have lots of new materials you can buy at a discounted price while helping out a charity.

  16. Rosie says

    November 27 at 2:40 pm

    What kind of bathroom countertop is that? I don’t have granite it’s the glue on cheap stuff lol can I still paint that?

    • Kim Anderson says

      November 28 at 1:47 pm

      Rosie, those countertops in our bathroom are a laminate. We don’t have granite anything in our home. I think that’s why it worked so well for us. It was a big change from dark green to that brown.

  17. Shelly says

    November 20 at 11:26 pm

    I had used the Rustoleum Cabinet Kit (thought it was too good to be true, but decided to try it anyway). It worked awesome!!! No sanding required and it got rid of that horrible golden oak color to a nice crisp white!!! Wish I took before and after pics, but that was pre-blog! It costs $65, but I figured I’d try it first and if it didn’t work we were going to purchase new cabinets anyway. By far those Rustoleum kits are great for a super cheap DIY!

    • Kim Anderson says

      November 21 at 6:57 am

      Shelly, thanks so much for reporting on your experience with the Cabinet Kit. If we could do that in our kitchen we would but our kitchen cabinets are seriously weird. Like 1980’s IKEA kind of weird. They look like cabinets you would find in a preschool classroom. They work just fine so we aren’t messing with them now, but I know the day is coming when I’m going to do some major changes.

  18. Evie says

    November 11 at 1:25 pm

    I painted my bedroom a red ochre color about six years ago and still love it. It needs touching up now and I’ll probably keep the same color. The furniture is dark brown wood and the fabrics are all cream and beige, the walls are the only bright color in the room. It feels warm and cozy and the warm glow makes my skin look good.

    So not a terrible idea, necessarily.

    • Kim Anderson says

      November 11 at 8:22 pm

      Evie, I’m so happy that you love you love your space. It was a terrible idea for me. I’m cool color lover so in the end I had to make the change lol. Your room sounds amazing! Mine was a buttercream, black, burgundy and red. Very World Market looking. My living room is a rich yellow which makes me feel warm and cozy so I really like that.

      • Shelly says

        November 20 at 11:17 pm

        Kim, I once painted my bedroom red and hated it too! I like you had the cream, black & red combo as well. I am definitely a cool color girl as well as my bedroom is now a charcoal gray, plum, white & light gray. The rest of my house is grayish hues and blue.

        • Kim Anderson says

          November 21 at 6:55 am

          Shelly, thanks for the comment. I love purple hues so that plum you are using sounds really interesting. Most of my house is now a blue or cream color. Thanks so much for taking the time to comment!

  19. Sarah says

    October 14 at 1:12 pm

    A great way to update is to paint new cabinets/ get new hardware. The house we bought was newish (~7 years old), but the cabinets in the bathroom were looking rough and just didn’t look right (they were sort of a golden oak). The 2 mistakes I’ve seen people make when doing this is 1) not priming 2) picking the wrong color for the type of cabinet. We wanted to do a cream color, so when we went to Lowes to get the paint we went to the cabinet section and found a sample that looked like what we were going for and compared paint samples to the sample cabinet. We were surprised by how dark of a cream the cabinet sample was! If we hadn’t done this the cabinet would have looked bright white which wouldn’t have looked right with the style of cabinet.

    • Kim Anderson says

      October 14 at 3:54 pm

      Thanks for the tips sarah!

  20. Neema says

    September 25 at 2:11 pm

    Hi Kim,

    Great ideas all! Thank you for putting them out there!

    I have the exact same faucet on my sinks, and have no clue how to get the faucet out (my counters are off-white corian). How did you guys do it?

    Thanks,
    Neema

    • Kim Anderson says

      September 26 at 7:39 am

      Neema, my husband replaced the sink but I think this video from Home Depot makes is look very simple and walks you through the steps of taking out the old and putting in the new. https://www.youtube.com/watch?v=BxrJkd2VbVs Thanks for commenting!

      • Neema says

        September 26 at 12:10 pm

        Thank you Kim!

        • Kim Anderson says

          September 26 at 2:29 pm

          No problem, I hope it helps!

  21. Alita Crosby says

    August 26 at 11:15 am

    A great option that I’m considering is the laminate wood flooring to cover up old, dated laminate or tile floors. Home Depot has it for $0.99/sq ft and it looks incredible! I included a website that shows the peel and stick vinyl type, but you get a feel for how amazing it will look when you’re done.

    http://www.agracefull-life.com/2012/10/master-bathroom-makeover-there-is.html

    • Kim Anderson says

      August 26 at 12:24 pm

      Alita, you did a great job with that floor makeover. I love it! Thanks for sharing your link.

    • Kari says

      September 18 at 9:07 am

      Thanks for giving me a shout out Alita!
      That means a lot!

  22. Vicky Bailey says

    July 14 at 8:46 am

    Kim. I enjoyed reading your article. I too like to buy the mistinted cans of paint from Lowes. I think that people don’t realize that this is not “cheap” paint, just paint that was mis -colored, thus marked down. Lowes has an amazing paint that has primer built in that only takes one coat.;It is guaranteed to cover as well as the $75 a can stuff.They also carry a bonding primer that helps prep areas that have been previously been painted with a high gloss paint or varnish. I work at a school, and the first day that school was out for the summer, I went to work on the inside of our house. I have sanded and patched walls (where the builder had failed to finish them correctly), painted, restyled, etc. I still have a lot of work to do on this house, but working on a very limited budget takes imagination and lots of research. Now, if I can just afford the removal and replacement of this flooring (most of which is original to this 1970’s tri level) I will be one happy home owner! Thank you for your article.

    • Kim Anderson says

      July 14 at 8:59 pm

      Vicky, I totally agree. The opps paint is the $30 per gallon paint just in a color someone didn’t like. I don’t recall a time that walked into someone’s home and thought, wow this paint is so fancy it must be the “good” stuff. lol You are a frugal gal after my own heart. I’m still trying to decide what to do about my carpet situation. Everytime I think I want update it, my son spills something on it and then I’m thankful I have old crappy carpet. lol We have started painting the outside ourselves so I’m planning to a do a post about that as well. Thanks for taking the time to comment!

      • pam graham says

        November 6 at 3:52 pm

        Oops!

    • Candace says

      August 3 at 9:33 pm

      In regardsti old flooring, I have seen articles on DIY pages where homeowners have had awful laminate flooring and painted it. One was in a laundry room and it looked amazing! The blogger said it held up very well to the foot traffic. If the flooring isn’t torn and is still in decent shape this may be a good option.

      • Kim Anderson says

        August 3 at 11:24 pm

        Candace, I know exactly what you are talking about. I’ve Pinned a ton of those things because it’s amazing what people can do to update a house with paint. I’d like to see updates on those posts about years later and how they are holding up because paint is fickle sometimes. In my case, my bathroom floor was terrible. In fact, come to think of it, I’ll post some pictures on here of what we did to the floors.

        • Shanna says

          November 6 at 2:18 pm

          I broke down and replaced all my carpet with hardwood. My son has severe allergies, and we felt the extra money was worth it in the long run. It was my splurge! It was DISGUSTING! When I was pulling the carpet I came to the conclusion no cat is ever litterbox trained, even if you think they are! The flooring guy ended up using Kilz on my subfloors to cut the odor! Needless to say I had an amazing flooring contractor. He laid the clear oak boards, sanded them, stained them an ebony color, then sealed them. Now if I could get rid of the halfway job they did with a retile in the kitchen and baths…all in good time…

          Thanks for the tips!

          • Kim Anderson says

            November 7 at 9:47 am

            Shanna, OHHH MAN! After we got our house painted this week by professionals I think we decided that we DIY whatever we can from this point forward. There are some great people out there who do good work, but I’m looking for people who want to do stuff with excellence. Not perfection. Just that they try and do stuff the right way without cutting corners. I think the flooring in our house will be our next big project.

  23. Amanda Wernsman says

    June 28 at 6:16 pm

    Hi Kim!

    Question about your bathroom counter top re paint. Have you had any issues with chipping or scuffs? Does that bathroom get used regularly? We are moving in a month or so and our new home is very outdated, so I’m planning ahead (for once) and getting ideas of some things I can do the frugal style. Loved all your suggestions and am intrigued by what you did to your bathroom counter. The bathroom I plan on doing that in is the guest bathroom and Will also be my daughters bathroom once she’s old enough to use it. Also, any suggestions on wood paneling? The living room has two walls of wood paneling (yuck)! Thanks 🙂

    • Kim Anderson says

      June 28 at 8:16 pm

      Amanda, I have had the paint on the counter tops for 3 years and there are 2 small barely noticeable chips. All I need to do is touch them up. I think that something sharp hit the counter as our in laws use it when they stay with us about once a month. That bathroom gets used ALL the time as it also my 2.5 year old’s bathroom. I mentioned this in a previous post but with my brown paint, when you leave something wet or water splashes it leaves little marks but they disappear once the counter is totally dry. With wood paneling I say PAINT IT! My good friend and neighbor lives in a similarly built house to mine from the 80’s and they have paneling in their living room but you wouldn’t know it when you walk in because they have painted it white. The room looks great to me. I would find some good tutorials on painting wood paneling and just go for it. Probably choose a light color. That’s is the beauty of our new DIY world. If you want to know how to do it, you can figure it out on your own.

      • Amanda Wernsman says

        July 2 at 10:04 pm

        I totally agree, my first thought was to paint and actually to go with white as well. I think it’ll brighten up the room a bit! I am so excited to start this new project! I’ll share my results once we get finished 🙂 thanks for the advice, I appreciate it!

  24. Heather says

    June 12 at 6:23 pm

    Another option for the ceiling fan is to paint it, assuming the old one is working well. My husband scuffed up the metal base and arms with sandpaper (we had a brass one) and spray painted it black. It looked 10 times better when he finished it. You can also buy new light globes for them as well.

    • Kim Anderson says

      June 12 at 8:30 pm

      Heather I love love love the idea of jazzing up what you already have. That is an excellent idea. I need to replace the fan in my office and I might just give that idea a chance and see how it comes out. I think I’ll even do a post on it, if it works out with the style that I have. Thanks for the comment!

  25. Wendy says

    June 10 at 5:07 pm

    Instead of a dome light over the table, I would suggest a barrel light
    fixture. Wider in diameter than its height, it would be semi-flush, still give plenty of head room, and perhaps put out more light than a dome light.

    • Kim Anderson says

      June 10 at 8:21 pm

      That’s a great idea. I don’t think I noticed those when I was shopping around for lighting. Thanks for the tip. If we move that light to the main kitchen area, I’ll probably replace it with a barrel light.

  26. Caitlin says

    May 15 at 10:47 am

    I hate to rain on your parade since these are awesome ideas but the counter top coating by Rustoleum is terrible. We did our kitchen counters with it and within a couple months had chipping all over. We decided maybe we had done something wrong so we did it again. After a couple months there are chips in the paint all over. It looks like we have sprinkled white paper confetti all over the countertops. I knew I couldn’t have been the first one to experience this so I got online and read the reviews for the product on Amazon. Man did I wish that I had read the reviews first. We would have saved a lot of time, stress, and $40+. Honestly I liked my old out dated countertops more than the mess I have now. Here is a link to amazon http://www.amazon.com/gp/aw/d/B003NEM98Q?pc_redir=1399892934&robot_redir=1

    • Kim Anderson says

      May 15 at 1:37 pm

      Caitlin, thanks for sharing your experience with the kitchen counter top information. I have them in my guest bathroom and have been pleased with outcome. It got the job done for me. As I mentioned, the only thing I find unsightly is when water drips it leaves a watermark until it’s dry. Other than that ours have held up really well and if I had to do it again in a bathroom, I totally would. I have not tried it in a kitchen so I appreciate your honest feedback about how they worked in your own home. I can see how the kitchen might be a different story given the high level of use and constant contact of dishes, pots and pans. Thanks so much for taking the time to help other people be able to make an informed decision about whether or not to paint their counter-tops with this product! I really appreciate it!

  27. Genevieve says

    April 16 at 11:16 pm

    Hi Kim! I have that exact same hideous bathroom light fixture and I love your new look! Any ideas where I can find instructions on how to do that? Thanks for the great ideas!

    • Kim Anderson says

      April 17 at 9:10 am

      Yes! Brittany Bailey at Pretty Handy Girl shows you step by step picture instructions for replacing those lights we have! http://www.prettyhandygirl.com/2011/08/changing-out-a-light-fixture-bye-bye-hollywood-strip-light.html

  28. Amanda says

    March 28 at 10:44 pm

    Love the article!! I have used Rustoleum Oil Rubbed Bronze spray paint on my kitchen cabinet handles. It worked great!! I bought it at Lowes. It does not peel!! I have heard of others who used it on doorknobs and faucets and it worked great there too. A friend of mine used the countertop paint on her kitchen counters and had great results. Another tip, be careful if you choose a green tone paint from Sherwin Williams. We had used their paint for years…like 10 or more. My mom painted a dining room green and got paint fume poisoning. The lady at S.W. told us it was common with the base they used for the green paint. We just chose to switch brands. I am adding you to my bookmarked blogs. I have enjoyed reading!!

    • Kim Anderson says

      March 28 at 10:51 pm

      Amanda, thanks so much for all the tips and things that have worked for you. I recently saw someone on Pinterest who had painted their door knobs and handles just like you and I’m thinking about trying it now that you have confirmed that they don’t peel. My cabinet handles are from the 80’s and I recently tried to replace them and came to realize that they are not a “standard” current handle size so none of my new handles would fit that cabinet holes already there. I’m going to have to paint them. I also like the idea of painting the door knobs because my hardware is all gold. If I’m re-doing everything in rubbed bronze finish I should just go for everything and spray painting is WAY cheaper than replacing it all with new stuff. So glad you enjoyed reading and would love to have you around. Please share any and all tips you have around the blog!

  29. April Layne says

    March 5 at 8:11 pm

    These are great reminders. We have used all of these suggestions through the years but sometimes you get tired, like I am now, and dream of ripping things out to the studs. Articles like these help me refocus and keep our financial goals and still like where I live!

    • Kim Anderson says

      March 5 at 8:39 pm

      April, glad you felt a little renewal in your since of contentment. I’m the same way about wanting to rip stuff out sometimes but then I think about how long it takes to do those projects. lol It’s not like those DIY shows on TV when they have a whole crew to come in and demolish, rewire, carpenter, sheet rock and paint in 2 days flat. Major renovations take months and years sometimes. The bathroom in the picture with the new faucet and painted sink top took about 3 years to update and all we did was rip down old green floral wall paper and put up wainscoting. Thanks for taking the time to comment!

  30. Elizabeth says

    February 10 at 9:24 pm

    Hi! Enjoyed reading your posts . One question, how do you think the countertop paint would work on kitchen countertops? With the food etc.; ie… toxic? Your thoughts would be appreciated . Thanks for sharing your ideas.

    • Kim Anderson says

      February 11 at 8:28 am

      Thanks for commenting Elizabeth. To be honest with you I think now a days nothing is that “safe” because it would seem we are absorbing chemicals just by breathing. I know what you are saying and to be honest with you, I think it just depends on your own personal take on stuff. If you are really really really weird about chemicals, this may not be your thing. I on the other hand I look at like, hey, they make it specifically for kitchens so they must be feel confident enough in the product that they won’t get sued over it. I don’t know if that helps, but I personally wouldn’t hesitate to try it. Here is Rustoleums response to your question: http://countertops.rustoleumtransformations.com/faqs.php . If you hate your counter-tops and think this would improve them as they did my bathroom, go for it.

  31. Lindsey says

    January 2 at 2:02 am

    Not to sound rude but the reason your red room took 4 coats is because of the brand of paint you probably purchased. You mentioned you like the cheap paint.. Never a good idea. We just purchased a house and painted every room using Sherwin Williams cashmere paint (we bought it on one of their 40% off sales) and let me tell you– good paint makes all the difference. We did a red and it only took 2 coats! We ended up putting 3 “just for good measure” but it wasn’t necessary. We have a friend who purchased paint from lowes and her walls don’t looks near as good as ours! Paint isn’t as even and All her rooms took several coats. But I’m not sure how good of painters they are though, either! But the quite of the paint on our walls looks professional. Good paint makes ALL the difference

    • Kim Anderson says

      January 2 at 9:15 am

      I’ve never tried Sherwin Williams before. The stores kind of intimidate me a little. How much would you say a gallon of Sherwin Williams costs? My red room was using the Behr Ultra. I didn’t do a lot of research before I started the red room project but on the 3rd coat I tried to figure out what I was doing wrong and started seeing all the people online discussing just how many coats it took to get the job done. Wish I had known about Sherwin Williams before I started, maybe I would have gotten a better color. I personally will never paint a “bedroom” that color again. Our room is now a nice soft blue and I love it. Thanks so much for sharing about the Sherwin Williams! I’ll have to check them out since I’m about to do a major repaint of my living room.

      • Heather says

        January 21 at 6:50 pm

        I also did red in my kitchen. I had an awesome paint guy at our local Ace Hardware store recommend using a tinted primer under my primer+paint. The first wall that I did I only used the paint+primer and used 4 coats. The second wall I used the tinted primer (it was pink!) and it only took one coat of the paint+primer.

        • Kim Anderson says

          January 21 at 6:56 pm

          Thanks for sharing this info. Anyone looking to paint red keep these things in mind…

    • Jaime says

      January 30 at 6:40 pm

      When painting red I always prime with dark colors like dark brown. Once I found on the oops section a dark hunter green and that worked… Then you only have to paint two coats. My mother-in-laws trick….it was mind blowing!

      • Kim Anderson says

        January 30 at 8:56 pm

        I never thought about using a dark green but that is great that it worked! Thanks for the tip!

  32. evelyn says

    December 29 at 4:41 pm

    do you have any suggestions for an inexpensive redo on TILE (60’s blue)?

    • Kim Anderson says

      December 29 at 7:58 pm

      It depends a little on where the tile is. If it’s inside a shower you may want to get professionals in on your “painting” or replacing. This article from doityourself.com talks about how to paint over old tile in areas that are not regularly soaked in water. http://www.doityourself.com/stry/paintceramictile#.UsDDsJqA05s
      If it were me, and it weren’t in a shower, I would totally paint it myself following the instructions from a site like this where they have done it and tried it. My parents house was built in the mid- 70’s and they recently had to have the bottom of the shower replaced. The tile was yellow. They couldn’t find tile that matched anymore so they just had white put in and your really don’t notice. The tile replacement was super expensive but they had situation where it was cracked and needed to be done or else water damage would take place. Hope that helps. Paint is becoming more and more amazing and if you use the right process you can do it!

  33. Jody Wolski says

    December 24 at 9:05 am

    Spray paint can be a wonderful tool when updating. I have spray painted cupboard hardware (handles) and shiny brass light fixtures. I buy them at garage sales and after spray painting they look totally new.

    • Kim Anderson says

      December 24 at 12:40 pm

      Jody! That’s brilliant! I have never thought of buying old hardware at garage sales and spray painting. That’s thrifty and smart!

  34. Tracy h says

    November 25 at 7:42 pm

    Hi kim. Thanks for the great update how-to’s on a budget. I need to keep my eye out for the oops counter. I wondered which product you used on your bathroom countertops and what you thought about the product. Thank you
    Tracy

    • Kim Anderson says

      November 25 at 8:34 pm

      On the countertops I used the Rustoleum brand counter top paint. It is about $20 for a small can. We needed 2 for that countertop and we still have some left over. I really like the paint. For $40 I can live with it. It comes in many different colors so you aren’t just limited to brown. You can’t even really tell it’s paint to be honest. There are times when I clean it with my bathroom cleaner that I can see where water has splattered but once the counter dries, you can’t see the water spots anymore… it’s kind of weird. But overall like I said, for $40 and no re-modeling needed, I think it came out pretty good. They have lots of different options for the counter-top paint. I got mine at Home Depot.

      • Alison says

        July 30 at 10:59 am

        Hi! I have a question about painting the countertops. We’re purchasing a home and it has the laminate and I hate it but I don’t have the money for granite, corian, etc… Do you think you could just use some sort of clear coat over that paint to seal it so it won’t chip?

        • Kim Anderson says

          July 30 at 11:15 am

          I don’t think we used one but this article has tips on what kind of top coat to use for the best outcome! Let me know how it goes Alison! http://www.hgtv.com/design/rooms/bathrooms/painting-your-countertops-for-a-new-look

Trackbacks

  1. Budget Bathroom Decorating Ideas - DIY Inn says:
    April 23 at 3:42 pm

    […] 4. These Tips for Updating Without Remodeling […]

  2. How To Love The Home You're Already Living In » says:
    August 13 at 2:38 pm

    […] You can also always buy a $25 can of paint and spend $100 on some decor and completely transform your space!  We live in a 1980’s home that had some pretty terrible color schemes going on.  Over time we’ve been able to transform some of the areas without having to totally remodel or rip anything out. You can see some of those changes in my post on “Re-Styling Your Older Home Without Remodeling.” […]

  3. The little things… | SRB Properties says:
    May 28 at 10:45 pm

    […] https://thriftylittlemom.com/2013/06/24/re-styling-your-older-home-without-remodeling/ […]

  4. Quick fixes that increase home value - DIY Craft's Home Decor says:
    May 18 at 3:49 pm

    […] Source: thriftylittlemom.com […]

  5. Re-Styling Without Remodeling. You can do lots of things yourself.- just in case :) - DIY Craft's Home Decor says:
    May 18 at 3:28 pm

    […] Source: thriftylittlemom.com […]

  6. i Home Making | Re-styling Your Older Home Without Remodeling » says:
    May 16 at 2:02 pm

    […] via Re-styling Your Older Home Without Remodeling ». […]

  7. Thrifty Thursday Link Party | Link Up Your Budget Friendly Blog Posts says:
    March 19 at 9:00 am

    […] Budget} 3. Frugal Debt Free Life {How Our Family Saves $10,000 a Year!} 4. Thrifty Little Mom {Re-styling Your Older Home Without Remodeling} 5. A Cultivated Nest {Creative Ways to Add to Your Savings Account} 6. Always Learning […]

  8. Easy ways to update while saving money! | Hartford, CT Real Estate :: Universal Properties CT says:
    March 18 at 12:33 pm

    […] HERE for more […]

  9. The How-to Weekly ~ March 1st Edition says:
    March 1 at 11:45 pm

    […] an older home like me and wondering how to restyle your older home with expensive remodel projects?  This is great […]

  10. 8 Ways to Turn Your Tax Refund Into an Investment says:
    January 23 at 11:01 am

    […] Updating your kitchen cabinets and countertops […]

  11. soliked.net » Decor #123 says:
    September 13 at 10:23 pm

    […] here via […]

Snag My Book

Available at:

Barnes & Noble

Amazon

Thrifty Little Mom is a participant in the Amazon Services LLC Associates Program, an affiliate advertising program designed to provide a means for sites to earn advertising fees by advertising and linking to amazon.com.

Copyright © 2021 Thrifty Little Mom · Web Design by Moritz Fine Designs LLC

This website uses cookies to improve your experience. We'll assume you're ok with this, but you can opt-out if you wish. Cookie settingsACCEPT
Privacy & Cookies Policy

Privacy Overview

This website uses cookies to improve your experience while you navigate through the website. Out of these cookies, the cookies that are categorized as necessary are stored on your browser as they are essential for the working of basic functionalities of the website. We also use third-party cookies that help us analyze and understand how you use this website. These cookies will be stored in your browser only with your consent. You also have the option to opt-out of these cookies. But opting out of some of these cookies may have an effect on your browsing experience.
Necessary
Always Enabled

Necessary cookies are absolutely essential for the website to function properly. This category only includes cookies that ensures basic functionalities and security features of the website. These cookies do not store any personal information.

Non-necessary

Any cookies that may not be particularly necessary for the website to function and is used specifically to collect user personal data via analytics, ads, other embedded contents are termed as non-necessary cookies. It is mandatory to procure user consent prior to running these cookies on your website.